After the 2nd World War, it's fair to say that Britain started building some great machines. The Likes of MG and Jaguar were really adding some style to British roads but this seems to pale into insignificance when compared with the Vulcan Bomber. An aircraft that was designed to fly higher, faster and deliver a devastating payload. This Nuclear deterrent was primed and ready to go. The 4 or 5-man crew had to be airborne within 90 seconds for Britain to be able to respond the early warning system that indicated a nuclear attack from the USSR and they practiced the drill over and over. Capable of cruising at 60,000 feet, just under the speed of sound, the design of the aircraft was to fly above radar and out of range of surface to air missiles. These capabilities are still respectable by today's standards, although now, air-defence systems are much more capable of deterring attacks of this type. Now, I had no idea about any of this until an engaging and knowledgeable guide took me on a tour.
The undercarriage was designed to take a payload of up to 40 regular bombs to take out things like runways, or deliver 1 nuclear weapon.
The sleek lines of one of the first production delta-wing aircraft were a feat of engineering techniques of the time.
Sitting in the cockpit, Roy explains the roles of the 4/5 crew-members, the technology they used and also a bit about their lifestyle. The smell and atmosphere of sitting there, listening to him recount the processes they went through really brought it to life. One of the very poignant moments that stuck with me is that when the crews boarded these planes to deliver a nuclear weapon, they'd be pretty much on a one-way flight. Even if they did make it back (the planes were designed to carry enough fuel to get to the USSR and back), they'd be coming back to total devastation and nuclear fallout.
One thing that did strike me is that the windows were very small, this was due to the pressure they'd be subject to, flying at high altitudes. They also had built-in heavy-duty blinds to block out the blinding and debilitating light-flash which is the initial output from a nuclear explosion. Many of the initial Vulcans were painted in Flash White to reflect this and the heat, that rapidly followed. Although this was a 'fly-by-wire' aircraft, the dials and and gauges were straight out of a Lancaster Bomber.
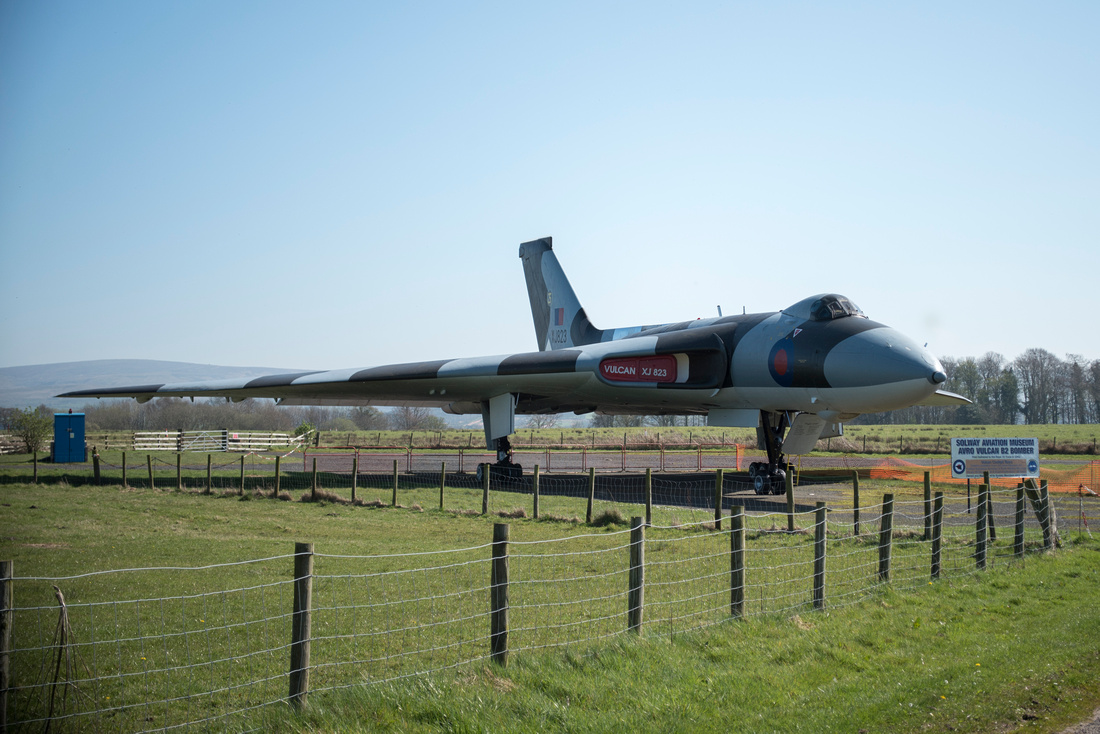
Included in it's capability is a ground radar system, which enabled it to fly just 50 feet from the ground when needed. The planes were in service between 1956-1985. This one is at the Solway aircraft museum in Cumbria and is worth a visit.
Belsay Hall and Castle in Northumberland. The castle was built in the 14th century and home to the Middleton family. The Greek-inspired Hall was built in the 19th Century as a new residence within the same grounds by sir Charles Monck. The spring flowers had popped up just in time for my visit. It was a mainly grey day with flat light and a bit of drizzle, as is the norm this time of year in the North East. But as the day progressed, the sun cracked between the clouds and created some nice warm light which was a welcome sight.
It was January. Well, New Years day to be precise. I had driven past a church a couple of times and thought it had some potential. Given it's location which was somewhere just outside of Ambleside in Cumbria, I knew that it might provide a good opportunity for some night time photography. The lack of light pollution from street-lights in the area meant that if the conditions were right, there'd be lots of stars to be seen. And as I discovered that was the case, although what I hadn't factored in was just how much it was lacking in light pollution and in fact, lacking any light at all. It was located where two narrow country roads split, so finding somewhere to park the car was the first challenge. I manged to just squeeze the car through the entrance and there was just enough room to turn around. This entrance-way was clearly never designed as a car-park. I switched my headlights off and then the engine. That's when I realise that sometimes one or two street lights can be a good thing! My sense of hearing becomes heightened to compensate for my eyes, which are now totally redundant. The rain which seemed sporadic, now seems ominous as it almost thuds off the roof of the car and the gusty wind is whipping through the overgrown vegetation. I sit for a few moments, hoping that my eyes would adjust, trying to use my peripheral vision to catch outlines of the dense trees which surround the church and the narrow path that leads between them and the church, to the graveyard beyond. But it just wasn't happening. I switch on my lights again briefly to get my bearings but not long enough so as to cause my eyes to re-adjust. I see where the path is and switch off the lights again. I pause to confirm to myself that this was a suitable night to take pictures. It's dark, windy with heavy spots of rain and about 2 degrees Celcius- a fact which I had completely forgotten about up to that point. I get out and zip my parker up, pulling the hood over my head, more to keep warm than anything else. I reach for my gear in the boot of the car and decide that rather than risk getting everything wet, I set up everything I can there, this'll also save me a bit of time fiddling around when I have no shelter. I set the camera onto the tripod on go for the standard setup I use for star photography; ISO 3200, F2.8 30 second shutter speed. I close the boot and I'm in pitch darkness again. I reach for my phone to use as a torch.. 18% battery... A number of internal expletives later, I'm walking the narrow path between the church and the perimeter wall which is lined with huge trees. I negotiate the gravestones, to reach the edge of the cemetery and look for a spot to set the tripod up. I look up and WOW! the stars were bright and there were billions; tiny dots of different colours which could be seen with the naked eye. One problem though, I couldn't see anything in the foreground or detail on the church itself. At this point my phone was completely flat. I used the outline of the church to try and set up a composition using the viewfinder, whilst the wind continued to flap the edges of my hood over my eyes and the rain pinged against my face. The digital spirit level on the D750 really helped out to make sure it was straight. I set the timer to avoid any camera shake, set the focusing to manual and and tried to get the sharpest view of the stars, hoping the foreground would also be focused enough to retain some detail. Pressing the shutter, I stood back for the 30 seconds. This is when you can stop thinking for a short while and enjoy the experience (usually) I glance around looking for any other compositions, taking a few deep breaths after I had held it during the set up process when I was concentrating. Suddenly, there was a tap on my back! I must have jumped about 5 feet and spun around to the branch from an overgrown bush being tousled around by the wind. At this point I realise I've become a cliche from a generic horror film and part of me finds humor in my ability to get into these situations, the other starts to write the rest of the film I've fumbled into. 'Click', the shutter closes and provides a welcome distraction. I check the image, sharpness is ok and composition isn't bad. I even caught some of the gravestones. Too many clouds though, so the stars are hidden:
I decide to change the composition to try and get more clear sky. Again, slight educated guesses at the composition and the focus distance were needed. Took another image - a bit better but needed a little trial and error to get what I wanted:
Happy with that result. Time to get back - fingers numb from the cold, legs wet and in need of some whiskey to settle the nerves! Top Tip: I used the pre-focusing light from the camera to light the pathway back to the car. Alternatively you can just take a regular torch {sighs}.
I've never been much of a collector of things and this has served me well recently after the introduction of a public art exhibition here in the North East. Based on the Snow-Dog of the 'Snowman and the Snow-Dog' film, there are 61 larger than life, models at various locations across Tyne and Wear. So, there was never a desire to see them all but the ones I did see were really fun. Each Snow-Dog is decorated differently to reflect the area they are located. They are shortly being rounded back up for a final display before being auctioned off for the St Oswald's Hospice Charity. If I had nothing but time, I'd have enjoyed searching more of them out (albeit via the handy map available on the website!) and capturing them in their natural habitat. However, as we are all aware, time is a precious commodity so I am thankful I was able to capture the ones shown here using the opportunities I had.
Over the years Beamish Museum has been a favorite place of mine to visit. The attention to detail the curators pay means there are new things to notice every time. It's a pleasure for any visitor to see the buildings, vehicles and artifacts from the 1800's to early 1900's. The difference Beamish has over some other museums are the 'actors' who really allow you an understanding of how life was lived during those times. As you wander round there are so many typical scenes from that time. Interactions between a shopkeeper and his customers, a farmers wife sitting sewing, even simple things such as a housekeeper setting up a fire in a town-house. All of these give a real sense of looking in on the past and appreciating it's hardships. But for me it also brings a sense of jealousy around a sometimes more simplistic, less complicated life. Although, that's probably an over-romanticised view given the 'simplistic' way we can now live our lives thanks to modern inventions. After all, I'm old enough to still remember waking up to the sound of coal being shoveled from the bunker on a cold winter morning to start the fire in my, grans' house. Given the choice, would I want to go back to those days? Honestly? No. On my previous visits I've always taken images of scenes but recently I decided I would look more to capture the essence of the museum through it's people. The image below is the result of that idea.
Nestled between the Tyne Brige and The Sage building lies the Church of St Mary's which is now also home to a visitors centre. A fact, which until very recently, I was completely unaware of. I pass this way a lot and have noticed the bell tower of the church so thought I'd take a look to see if it would provide an alternative view of The Sage building or the Tyne Bridge. These are two of the most photographed structures in the North East and getting an original angle or composition proves to be very difficult. So, I was a little excited when I took an initial walk around the location and saw a couple of compositions that might work. The image below was the first one I took.
The next image comes from one of my best self-learned tips in Photography. 'Look behind you'. Quite often you'll approach location and spot an obvious composition. You'll then spend 5 minutes or more studying the light and deciding on the focal length, getting your tripod into position, finalising the compostion, etc, etc and what you will end up with is an image you're content with. You'll then pack up your gear and head off, only to discover that as you drive away, there's something you didn't spot and you kick yourself! For me, I still prefer the first image but what I like about the image below, is that there is a juxtaposition between the old, weather-worn gravestones and the sleek, architectural lines of a modern, iconic building. Which had I not turned round, I would have missed completely.
In the following image, even at 24mm it just wasn't quite wide enough to get the full width of the building in, so I decided I would go for a panoramic shot. It's made up of 3 frames, stitched together and processed to give a light and airy effect, which is very different from the black and white above.
The final image I took was from a great view of the Tyne Bridge which I had not seen before. It's on my list to go back and photograph at sunrise as this will provide a nice light on this side of the bridge. Nearly all of the images I see of the Tyne Bridge are taken from the other side so I'm looking forward to getting back there.
Upon completion of the process below, the design of the product had changed, rendering this image obsolete. That's something that you have to accept when working on new projects and why you have to remain flexible and positive with clients. Rather than simply archiving the image, I thought it might be useful to share the process and create a little tutorial. Waste not want not.....
I was recently approach to produce a series of technical specification sheets. These were to be used to present to potential buyers as part of sales pitches. This was very much about capturing the the actual product itself, clearly and simply. This differs from the marketing shots you would see in advertising billboards or magazines and works more along the lines of standard, 'stock' photography - a clean white background with the product correctly exposed with as clear, sharp detail as possible. The lighting setup I went with for the series of images is below:
The setup was 3x studio strobes. A softbox was added to the strobe on the far right to provide a brand and soft light. The strobe to the left of the product was the key light and was modified with a honeycomb grid and barn-doors. This was so I control direct light on the product. The strobe on the left just had a standard reflector and was used to ensure the background was pure white and remove any shadows. It would also, bounce the light off the background giving some separation on the subject. The camera was set on a tripod in portrait format and locked into position as I would be taking a series of images to create the final shot. Camera settings were ISO100 @ F13 1/160s. This produced the image below:
Not the most inspirational image I've ever taken but it's what was required. So that was the firs part done. Behind the mesh fascia on this product, there is a series of brightly coloured LED's that synchronise with the music that it plays out. So, how do I reproduce the lights and still retain a hi-key look. The problem here is that when you're firing about 1000 watts of light at the product, the low power of the LED's are completely washed out. I switched my remote strobe trigger off and left only the modelling lights on the two strobes pointing at the product. This left the product only lit by two modelling lights but the image wasn't popping enough colour from the LED's. So, I switched off all light sources, I changed the camera settings to F2.2 and 0.8 seconds shutter speed. Why such a long shutter speed? The reason is that the LED's, when activated were a little unpredictable and faster shutter speed only produced a small amount of light details. I took a series of images and the one I settled on is the one below:
So, now I have an image that is correctly exposed for the unit and one which shows the LED's. I need to combine these shots to create the final image. I imported both images into Photoshop and stacked the LED image on top of the correctly exposed one. I then applied an layer mask to the LED image and painted with a soft edge brush to reveal only the vibrant LED's. I chose to mask the image and use soft-edge brush rather than creating a selection as it gave a much more evenly graduated transition on the edge of the LED image against the harsh hi-key image on the layer below it. It didn't need to be accurate, it was more important that it looked believable. The final image is below:
It was at this point the client emailed to say 'We've changed the design, we'll get a sample sent over you and also, the other product which is in black needs to be pink. Can you do that ?'...... 'Yes, of course', I said.
In a previous post I talked about street lighting and the effect it can have on colour-casting in your images. That shouldn't deter you though as capturing light and shadow is what photography is all about. Below are a series of images I took at various points in 2015. The next time you are out and about between sunset and sunrise, have a think about how you can use these light sources in your images and experiment with different compositions. Certainly they may not be as spectacular as a long exposure shot of star trails or light trails from passing vehicles but I do enjoy the way they convey a sense of stillness and quiet.
I had planned to get some early morning shots of the Cathedral. The weather was pretty clear so I headed for Wharton Park only to find out that it was closed as they are currently going through a regeneration project. Plan B?... I took a short walk and I wasn't disappointed. In my previous post I talked about the issues that can arise from the various street lights. In these images, I have used the lighting to add to the scene. It did take a little tweaking of the colour temperature in post-processing but I feel it adds a different dynamic to the shot.
I really enjoy working in black and white. The strong blacks and bright whites add drama for me and that's definitely my style. Black and white can also be useful at times where the subject may have lots of mixed colours that don't complement each-other, or the composition is very strong and colours distract from the shape or form of the image. Given that I shoot landscapes mainly on early mornings, the orange/red street lights can give off a colour cast that can all but ruin a shot. The options can be either select to balance the colour by cooling it down, or get rid of it altogether. Either shooting in manual white-balance or by fixing it in post-processing can leave some of the natural colours looking anything but natural so, often there's a compromise to make, or some serious time in Photoshop! I'm not averse to spending hours editing a single image if I think it's worth it but in general my preference for black and white takes over and I can get immersed in achieving the darkest blacks and whitest highlights to create a dramatic image. Below are all images I've shot early morning and use these techniques.
County Durham's past of mining for coal and tin, amongst other natural resources, spawned lots of small communities to house the miners and their families. Over the years the closure of these mines left many of the villages in the County sparsely populated as people moved to the bigger towns nearby. In turn, these villages became neglected as unemployment rates increased and the desire for new people to move to these areas was low. Gradually, these areas are being invested in as the appreciation for the beauty of the area is being realised. Old pit sites are beingconverted into country parks and a popular new housing build on the old Vane Tempest coal mine site has brought a lot of new people to the area and with it, opportunities for local businesses and an increased interest in the nearby coastline. Seaham is part of the Durham Heritage Coastline which runs from the North of the County to Hartlepool in the South. One of the lesser-known beaches is situated at Blackhall Rocks, about 10 minutes drive south of Seaham. This is a rugged, pebbled beach with lots to explore and some days you have it all to yourself. The images below are all from Blackhall Rocks beach.
Overlooking Glasgow Cathedral sits the Necropolis. During the Victorian era, there was a focus to demonstrate power and wealth in death as well as life. There are reportedly approximately 55,000 people buried here. Not all of the graves have stones. There are however, 3,100 monuments and large headstones that highlight the Story of Glasgow through this period and into the early part of the 1900's. There are tombs, Monuments, sculptures and mausoleums. I was surprised that there were no sculptures of angles but having read up about it, those types of sculptures were not introduced until much later. Some of the hand carved marble is simply stunning and I shudder to think of the cost back in those days when simply moving it from one place to another seems like an impossible task. In some old cemeteries, there can be a feeling of unease but with it's high viewpoint and winding paths, the Necropolis draws out feelings of peacefulness and dare I say, contentment.
This series of images looks at the way that a city deals with the conflict between aesthetic and functional design. In most large cities across the UK it is apparent that as both population and tastes have changed, so too has the design, materials and vision. Many of the unusual pathways, roads and public areas are a result of architects and town planners never-ending battle to make sure that these cities work for the people that live in them. In older cities we can see stairways that don't go anywhere, remains of ancient walls nestled below glass-fronted shopping centres and public areas with greenery that is only there by design. New buildings use the latest technologies to increase energy efficiency, maximise the use of space and drive down costs. The phrase 'they don't make them like they used to' certainly does apply to buildings but is this because historically, there was no other way? Would the great engineers have built things differently? and do modern designers and builders have the same passion for craftsmanship that seems to be synonymous with those from the turn of the century? all opinions to be discussed and reviewed again in another 100 years...
Spooky Cabin, which has long been deserted |
Quite a difficult shot to expose here given that I wanted the focus on the bridge through the doorway, without underexposing the foreground. |
The focus on the very bottom of the frame here seems to create a 'miniture' effect. Often this is also achieved using a tilt-shift lens or by applying blurring to various areas post-processing. |
The foreground here has a heavy bokeh (out of focus) this leads the eye straight to the Chair and then onto the textures of the trees. |
I took 2 shots from here. The second one I focussed on the third step (upper 3rd of the frame) but I much preferred the level of detail obtained from the one in the bottom 3rd. |
Where you are not cropping in very tightly to the subject, think about the background.. |
Cropping in tightly can show texture and colour |
Desaturation of surroundings |
Hi-key shots can look fairly 'arty' if you can be patient enough to get the lighting just right |
Try different things and see what works |
Soft tones have a calming effect |
Macro shots can show the everyday to be special |
The Town Hall in the centre of the Market Square |
This shot is from the rear of the town hall with St Anne's church on the left |
During the summer this is a hive of activity but during the cooler months all that can be heard is the gushing water and the odd Land Rover Defender passing by. (Below) Early morning mist providing an erie cover for the Cathedral in the background |
I'm a bit indecisive about this shot. I wanted to get the impression of being left behind by capturing people walking away into the distance. |
Small car washed away... (top left of pic) |
Original and (right) slight crop and b&w conversion |
I really like the older areas of graveyards... |
Some strong contrast and bold shapes lurking in the overgrown grass |
Worn sculpture offering some 'soft' lines. Sepia used rather than staight forward b&w conversion |
I like the way this has given the impression of a moonlit shot. |
3 main elements in this shot. The lush, green grass and the roaming pathway that leads they eye to the resting point of the large rock. |
The stones are the main focus here and everything else seems to 'blend' away. |
A Small boat on Ullswater. The poignancy of this, is that it was taken during terrible floods that ruined bridges, yet the boat remains calm and unaffected. Just sitting patiently and calmly |
A simple, large moon in the mid-afternoon winter sky. |
The morning light on the steeple was all the original single image had to offer. By using HDR it has improved the colour and contrast. |
I could see potential in this shot but even with a 'vivid' setting on the camera it lacked the impact the morning light commanded! |
The original image was quite nice but using HDR has allowed me to show you the scene as I 'saw' it. |